
A few weeks ago I was selected to participate in a little blog challenge...and today's the big reveal day! The centerpieces for the adventure are these handmade copper cones from Kiersten Giles of The Cerebral Dilettante blog fame.
Prolific inspirer and fellow blogger, Lorelei, picked five of us, plus herself, to push the limits of cone creativity. They're a pretty standard component in jewelry, especially in multi-strand pieces. So, it was time to think about cones differently...the gauntlet she threw at us was all about unique!!!!
Well...here's my take...
I immediately noticed the gently folded edge along the top of the etched copper and thought of rolled paper. That led me to a cone reversal so that instead of something flowing out of the cone, I'd have something flow up...
ooooohhhh....like a farmer's market bouquet! You can see some of my sketches at an earlier post here.

This first piece isn't so much jewelry as it is a little decorative ornament that could hang somewhere to liven up a space with sweet little copper and brass flowers and tendrils in a perfect copper "vase."

I have somehow managed to accumulate a massive stash of tiny flower pieces so I went to town with them and a variety of brass and copper headpins and created a bunch of different flowers by layering the little components along with some metal spacers. I didn't want to create massive wire-wrapped stems, so I opted for some heavy duty glue to keep the flowers together at the ends of the headpins. Just in case you try this...open some windows when you work with glue or you'll have a mysterious headache for two days...haaaaaaaaaaaaaaa
I was digging through my "scrap" wire container looking for small pieces to make spirals and happened upon a bunch of copper and brass that I had used to practice "balling" with my microtorch. Because I was going for a rustic mix of metals, the odd fired finish at the ends was perfect for more tendril-looking spirals.
My second cone was destined for a similar treatment but with a little bit of a different finish....it became a pendant:

I used a silver pendant "blank" and glued the cone in place. I used some clear glue (less fumes, since I figured that drama out) to fill in and create a kind of resin background. 

Then, I added the flower bouquet! A few sets of leaves from my "metal component" stash drawer rounded out the little nosegay.

With a simple little copper ball chain, it's a really pretty accent to a plain white t-shirt! The flower stems are all attached to a base wrapped loop, so they can actually be rearranged within the cone/vase.

Here's a shot of the working stems as I tried to decide how many to use and create the varied heights that would make the bouquet look balanced and unique.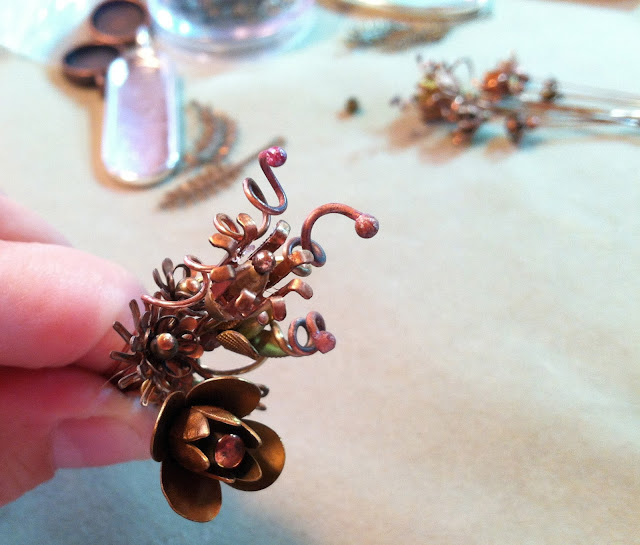

And, there you have it! Cones on the up instead of the down!!!
I was thinking as I made this that I should do a tutorial...if you think that's a good idea, let me know in the comments and I'll work on some pictures of the in-construction piece so you can see how it all came together. :)
And, now to point you in the direction of my fellow cone-ites for today's challenge reveal:
The host:
Lorelei Eurto at her Blog
The Crazier Sister at Crazy Creative Corner
BeadBug at Copper Glass and Recycled Trash
Yay!Jewelry at the YaY! Jewelry blog
Lori Michaud at the Artfully Ornamental blog
Thanks for stopping by!


